When I moved across town to a new apartment at the first of August, mom and I decided that we'd take my Aunt Patty up on her very kind offer to let me use a dresser and mirror that were being stored in her garage.
 |
| before |
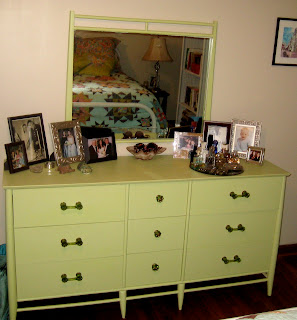 |
| after |
Even though I have suspect wall painting skills, I thought painting a dresser couldn't be too hard. I mean, after all, Pinterest does makes it look oh so very easy. Well I am here to tell you that it's not easy, but it's also not impossible. Patience and letting go of my perfectionist tendencies helped me through painting the round edges and bottom rods and obsessing over the brushstrokes showing even after the paint dried. They give character, right? At least that is what I am telling myself.
Dad and Steve took care of most of the sanding for me, which I greatly appreciated since it was August in Alabama and hot as the dickens standing still much less working. We discovered that there were in fact two coats of paint already on the dresser, so the sanding took the good bit of an afternoon. We didn't get all the paint off, but the bottom layer seemed to not peel like the top. on the 6 long drawers, I covered the holes for the knobs with wood putty and sanded those spots down after they dried over night.
 I started painting the next day, and it took me the better part of a morning to get the first coat applied. It went on well, and I wasn't too worried about brush strokes since I was going to put another coat on the next day. The paint went on the flat surfaces quickly, but the rods and legs proved to be quite time consuming, leaving me to conclude that no one was going to scrutinize the paint job on those parts because they are way below eye level.
The next day, Steve came over, and we painted the second coat. This is when I realized that the brush strokes were not going to dry smooth and tried to make the strokes less obvious by working in small sections and paying attention to paint in only one direction. That worked marginally better except for when I tried to touch up places that I had already painted, which caused a big grainy mess on the top, so I sanded and painted a third coat on the top that night.

 On day 3, I installed the knobs for the center drawers, and Steve drilled the new holes for the pulls. After a few times marking and drilling from the front of the drawer, he decided that it would be easier to drill from the inside. I don't suggest this move; it made for splintered wood and necessary paint touch ups. But after much sweat on Steve's part, angst on mine, and super glue for a broken glass pull, the knobs and pulls were all installed.
All in all, I love everything about my new-to-me dresser and am proud to have succeeded at a non-sewing DIY project.
 |
| Here's a photo taken right after we put the dresser together for the first time after painting. I love the color and hardware. |
I think it looks amazing! I'm in love with that color!
ReplyDeleteThank you, Laura! It's a Martha Stewart color from Home Depot called Calabash. I definitely recommend their paint.
DeleteOoo, I love this! And I love your blog, Anne Franklin!
ReplyDelete