Thursday, April 11, 2013

An Apartment Kitchen Restyle


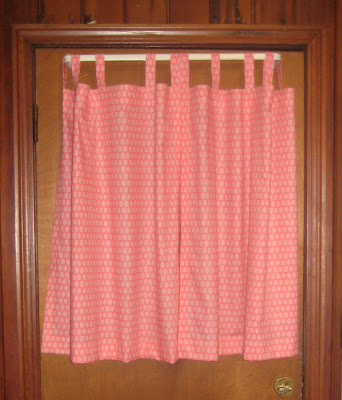
In the middle of January, I walked into our kitchen and thought to myself, "I can replace those curtains." For some reason, I had never realized that those ugly plaid curtains were something I could change. I simply saw them as an extension to the dark wood paneling walls and cabinets. I don't know exactly what spurred this realization. Maybe it was the lack of sunshine during a particularly rainy January or my general distaste for the feel of our kitchen, but this revelation led me to restyle as much of our kitchen as possible.

Of course,  I called Mom to brainstorm ideas, and we talked through possible ways to brighten the kitchen without painting (my lease won't allow it).


We settled on three main changes:

1. Covering the kitchen table in laminated fabric
             -Our kitchen table is actually an old Singer sewing table, which my mother had covered in              formica and used in her sewing store. 

2. Making two new curtains
             -I used a coordinating pink fabric from our local fabric store to construct these curtains and give         color to the walls

3. Hanging a pegboard
            -Thanks to Julia Child and my mother, this pegboard functions as storage and art. 


I loved throwing my creative energy into choosing fabrics, sewing, painting, and researching the pegboard. Now that I have finished these three projects with help from Mom, Steve, and Collyn, I am delighted to reveal our results.

First, a few BEFORE photos: 

The table was my first project.
I completely forgot to take a photo before I covered it.
Imagine a dark grey formica instead of fabric.

These curtains came with the house. 

The wine rack and the pie safe are here to stay,
but the little curtain had to go.

So, you see the dark floor, dark walls, and dirty green curtains. Something had to change. The prints over the table were left from undergrad. I don't mind them, but they were only aiding in the darkening of the room. 

Now, for the AFTER photos: 


Thanks, Collyn for decorating the washer and dryer!

Just a few photos of the rest of the kitchen: 


Well, there you have it. I am beyond thrilled with the outcome of all three projects and now love walking into our kitchen. In the coming weeks (after the end of the semester), I will post descriptive, how-to guides for each project. 

Wednesday, February 20, 2013

A Salted Caramel Icing


Caramel intimidates me, plain and simple. It always has. I have many childhood memories of watching my parents work together to make Mom's much loved caramel icing that tops a hot milk sheet cake. The whole process is nerve wracking to even watch let alone participate in because so many things can go wrong--the sugar can burn or the caramel can get grainy if not poured and spread quickly enough. The icing alone takes a few hours, lots of patience, teamwork, and perfect timing, and these are the reasons that I have never attempted mom's caramel cake on my own.

So when Mom suggested that I make a caramel icing to top chocolate cupcakes for our English Graduate Organization bake sale, I thought to myself, "Well, that's not going to happen." But Mom reassured me that she had a different caramel icing recipe from her Aunt Harriet that would not be as painful or time consuming as her traditional caramel. This recipe is traditionally used to top a prune cake, but it was indeed very simple and worked perfectly for these cupcakes.

To begin, I baked the cupcakes, using my chocolate cupcake recipe and let them cool completely. Then, it was on to the icing.


Salted Caramel Icing
1 stick butter
1 cup firmly packed brown sugar
1/4 cup milk
1/4 teaspoon sea salt or Kosher salt
2 tablespoons heavy whipping cream
2 cups powdered sugar
1-2 tablespoons sea salt
1-2 tablespoons raw sugar

In a medium-sized sauce pan, combine the butter, brown sugar, and milk.

Bring these ingredients to a boil, stirring frequently with a whisk. Let the mixture boil for 3 minutes, continuing to stir.

After 3 minutes, add 1/4 teaspoon of the sea or Kosher salt. I used Kosher because it dissolves very quickly. You can also adjust the amount of salt to your liking. I love salted caramel, but I have found that I enjoy more of a subtle salt taste rather than an intense one.

After whisking in the salt, add the whipping cream and continue to whisk. I added the cream to the original recipe to thicken and smooth the icing.

When the cream is incorporated, remove the pan from the heat, and use a handheld mixer to whisk in the powdered sugar a cup at a time. Continue mixing the icing until it is completely smooth and cool enough to spread.

There is a small window of time to ice the cupcakes and sprinkle on the salt/sugar garnish, so I suggest mixing equal parts sea salt and raw sugar in a small bowl before beginning to ice the cupcakes. Like the salt in the caramel, you can alter the ratio of salt to sugar or cut out the sugar entirely according to your salt preference. I used the raw sugar not only to cut the salt but also because I like the way larger, darker grain of the raw sugar looks and tastes.

After spreading the icing on an individual cupcake, immediately sprinkle on the salt/sugar mixture to insure that the sprinkles stick to the icing before it hardens.

Try to ice the cupcakes as quickly as possible to avoid the caramel becoming grainy, but if it does, whisking it quickly over low heat with the handheld mixer will give you a little more time to complete the icing process.


Whether these are for a school bake sale or a fancy party, I promise that these cupcakes won't disappoint any of your friends or their taste buds.

Happy baking!

Monday, January 28, 2013

A Whole Wheat Morning Glory Muffin

I am on a mission to develop healthy-ish, but still tasty, breakfast muffin recipes. These pumpkin muffins were a start, but I still feel a little guilty eating something with chocolate chips more than once or twice a week. When Mom mentioned that she had baked Morning Glory muffins a few weeks ago and that they froze well, I started looking for recipes. Let me tell you that there a quite a few different types of muffins that fall under the Morning Glory title. After a few hours of reading recipes, I decided to just work with the basic muffin recipe from my pumpkin muffins and use ingredients that I already had at home.

Morning Glory muffins

I am thrilled with the way these turned out. The whole grains, carrots, and apples don't over power the muffin like I was afraid they would, but they do make for a hearty taste. Steve, who usually turns up his nose at anything that appears to be healthy, was skeptical of the grated carrots, but he ended up eating a few after dinner last night and gave them a thumbs up.


Whole Wheat Morning Glory Muffins

1 1/2 cups whole wheat flour
1/2 cup AP flour
1/4 cup wheat bran
1/4 cup ground flaxseed
3/4 cup granulated sugar
1/4 cup brown sugar
2 teaspoons baking soda
1 teaspoon baking powder
1 1/2 teaspoons cinnamon
1/4 teaspoon cloves
1/8 teaspoon nutmeg
1/4 teaspoon ginger
3/4 teaspoon salt
1 1/2 cups peeled and grated carrots
1 large peeled and grated apple
1/2 cup chopped walnuts
1/4 cup dried cranberries
1/4 cup raisins
4 large eggs
2 ripe bananas
3/4 cup vegetable oil
2 tablespoons molasses
2 teaspoons vanilla

Whisk all dry ingredients together in a large bowl.

Grate carrots and apple. Combine with raisins, cranberries, and walnuts. Add to the dry ingredients and  stir until incorporated.

In a medium sized bowl, mash bananas and whisk together with eggs, oil, molasses, and vanilla. Add to the mixture in the large bowl and stir until evenly incorporated.

Coat 18-24 muffin tins or use cupcake papers. Fill tins and bake in at 375 degrees for 20-25 minutes.


A Healthier Pumpkin Chocolate Chip Muffin

I've been on a muffin kick lately. I guess this is better than a cookie or cupcake habit, but we all know muffins can be deceptively high in calories. So, I took my original pumpkin muffin recipe added some whole wheat and cut back on the sugar and oil.  I actually think the wheat bran adds a nice texture, and I barely missed the sugar. I don't know the exact calorie count or nutrition breakdown, but these are definitely a step in the right direction.


Ingredients

1 cup AP flour
3/4 cup whole wheat flour
1/4 cup wheat bran
1 1/4 cups sugar
1 teaspoon baking soda
2 teaspoons baking powder
1 teaspoon cinnamon
1/4 teaspoon ground nutmeg
1/8 teaspoon cloves
1/8 teaspoon ground ginger
1 teaspoon vanilla
4 eggs
3/4 cup vegetable oil
1 15 ounce can pure pumpkin
3/4 cup semi-sweet chocolate chips (optional)

Whisk dry ingredients together. Mix in liquid ingredients. Then add chocolate chips, if you so desire. Coat 18-24 muffin tins with cooking spray or use cupcake papers. Divide batter among the tins. Bake 20-25 minutes at 350 degrees.

These muffins also freeze well. I take them out one at a time and pop them in a warm oven for 5 minutes, and they're ready for a quick breakfast.


Sunday, January 13, 2013

A Second Goal Accomplished: A Picnic with Steve

I'm quite a bit late posting about this goal from 4 Simple Goals Before 2013. But I forbid myself from blogging during the busy end of the semester, and the break just got away from me.

Long live the Hercules (Steve's bike).
It was stolen a week or two after the picnic.

On a lovely Sunday afternoon in November, Steve and I went on a picnic to celebrate a little milestone and enjoy the warm weather. We picked Manderson Landing, a park that overlooks the Black Warrior River, as our destination, packed up the bikes with a mom-made quilt and a little lunch, and headed out. It was a lovely day complete with fall leaves and adorable dogs.


I baked french bread the day before and made a big picnic sandwich for us to split. Steve brought the chips and cokes.


Steve wasn't too impressed with the Renaissance Fair-esque sword fighting going on across the sidewalk, but it's all a day at the park.


I also baked some pantry cookies. I'll post this recipe and the one for the picnic sandwich soon.


My mother made this quilt for my dorm room bed my freshman year of college. I simply love it, and it's perfect for a picnic.


I'm afraid I will only be 2 for 4 on my 4 Simple Goals before 2013. I'll put the letter writing and dressmaking on my list for the new year.


I enjoyed a Christmas break filled to the brim with sewing, cooking, traveling, and visiting with family. Now, I'm a few days into the new semester.

I hope that y'all enjoyed the holidays and your new year is off to a nice start.