Tuesday, August 28, 2012

An Eggplant and Tomato Pasta

I bought some lovely Japanese eggplants at one of our local farmers markets, Homegrown Alabama last week and made this tasty and healthy pasta with them last night. This recipe is riff off of a pasta dish that I've seen mom make but with a few changes of my own, mainly because I couldn't remember exactly how she made it and didn't want to bother her with constant phone calls during suppertime.


Ingredients:
3 eggplants
3 tomatoes
2 cloves of garlic
2-3 tablespoons of extra virgin olive oil
1 box of whole wheat rotini pasta (less can be used)
parmesan cheese to be grated
salt to taste

Warm the oil olive and chopped garlic in a pan over low heat.

Chop the eggplant into roughly bite-sized chunks. The eggplant will draw up some as it cooks, too, so no worries about too terribly precise chopping skills. We're going for a rustic look anyway, right?

Add the eggplant to the olive oil and garlic, and saute for 15 minutes over medium heat. I salted the eggplant at this stage and again at the end after adding the tomatoes.


Chop the tomatoes into slightly smaller chunks. This size will keep the tomato skins from being too large and overwhelming in one bite. I am just not into the peeling tomatoes, but I guess you could, if you don't like the skins.

After 15 minutes of cooking the eggplant, add the tomatoes, reduce the heat to low/medium, and let the tomatoes simmer and mix with the eggplant for 10-15 minutes. In the last few minutes of cooking the eggplant and tomatoes, grate as much parmesan as desired over the dish and stir.


After adding the tomatoes, begin heating the pasta water to a rolling boil. I always add a touch of salt to the water.

Add the pasta and boil for 8-9 minutes or until you get the consistency that you prefer.

Drain the pasta and mix with eggplant and tomatoes. More parmesan can be added here if desired.


The pasta to veggie ratio was a littler higher than I would usually prefer, but this dish made for a healthy dinner that satisfied my desire to incorporate more whole grains with my love for fresh, local vegetables. The eggplant brings a hearty texture and tangy bite to the dish, while the tomatoes lend taste and help bind the dish together. Choosing the rotini rather than my regular angel hair pasta seemed to work well with the size of the the eggplant and tomatoes.

Even Steve, a fried-anything, more-calories-the-better meat-eater, enjoyed this dish, so the next time you find yourself wondering what to do with a few eggplants, try this out and let me know how it works for you.

Enjoy, y'all!

Saturday, August 25, 2012

A Peach Pie

Peach pies are one of my favorite summer desserts. The combination of fresh, sweet peaches and a buttery crust could make anyone smile, but in my family that taste takes us back to long summer days by the water at the lake house in Chilton County, Alabama, the home of the best peaches in the South.


A few years ago, I came home from the farmers market delighted that I had found Chilton County peaches and ready to make a pie, but I quickly realized that I had only ever made crust in a food processor, a kitchen appliance that my tiny grad school kitchen does not include. I immediately called mom, and she reassured that this was not an impossible task and crust had been made long before the food processor was invented. With her ingredients list and over-the-phone guidance I learned how to make crust with two knives and a fork. It works surprisingly well and makes quite a crispy, buttery crust.


The Crust:
2 cups of AP flour
1/4 teaspoon of salt
8 tablespoons (1 stick) of cold butter
4 tablespoons (1/2 stick) of cold margarine
5 tablespoons of ice water


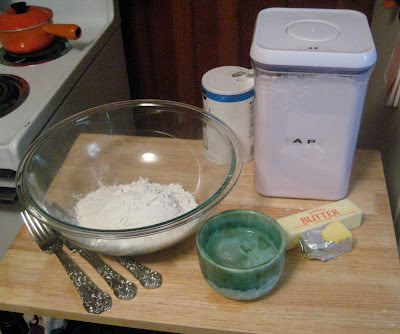
Combine the flour and salt in a large mixing bowl.

Cut the butter and margarine into single serving sized pats. It is important that the butter and margarine have just come out of the fridge because chilled butter holds its consistency when cut into the flour.


Take two knives and cut the butter and margarine into the flour, starting with the knives crossed and pulling towards the edge of the bowl. This action cuts the butter into smaller pieces and binds the flour to all sides of the butter.


After about 5 minutes of cutting when the butter looks like large pebbles in the flour, take the fork and mash the butter and flour through the tines to further incorporate the mixture. This will also cause butter to build on the fork. Use a knife to scrape off the build up and keep mashing. In between mashing, move the fork around the wall of the bowl, making sure that all of the flour is incorporated. The mashing step is complete when the mixture looks like coarsely ground corn meal (see photo below).


Now add the water a tablespoon at a time, first mixing with the fork and then kneading with your hands. The ice water helps the mixture come together without completely incorporating. 


You should be able to see swirls of butter in the kneaded crust. These swirls make the crust flakey and buttery without density, so don't over knead.

If you are using a round pie plate, separate the crust into two equal sections, wrap them separately in plastic wrap, and put them in the fridge for at least 1 hour. There is no need to separate the crust if you are making a larger cobbler that will only have a top crust. 


Side note: I use this pie crust for most of the pies that I make, and if I am making a pie that only requires the bottom crust, I put the other crust in the freezer and save it for the next pie or quiche.


The Peach Filling:
7 to 8 peaches peeled and sliced
1/2 cup of sugar
2 tablespoons of cornstarch
2 tablespoons of butter

Slice the peaches, and mix in the sugar and cornstarch.


Roll out the bottom crust.


I use this folding technique to move the pie crust to the pie plate without stretching or tearing the crust.


Place the crust in the pie plate, pour in the peaches, and slice the butter on top of the peaches.


Roll out the top crust and arrange it on the pie. The look of the top crust is completely up to you. I normally cut strips and make a lattice top, but a one piece top crust works just as well as long as you cut slits for the steam to escape.

Place the pie plate on a cookie sheet and bake at 350 degrees for 1 hour or until bubbly. Keep on eye on the crust, and if it is taking longer for the filing to bubble cover the edges of the crust with tin foil to keep them from burning.


Steve and I celebrated the first day of classes with peach pie. It was a nice way to end the summer. Hope y'all enjoy the recipe!